By
Daniel L. Symmes
“Hi, I’m Andrew Parke. I’m the cameraman on a low budget film that will be shot in 3D.” So was the start of a phone call in January ’05. Andy was researching 3D production and contacted the “usual suspects.” NIGHT OF THE LIVING DEAD 3-D initially had the working title of THE UNDEAD 3-D to prevent others from discovering that the original film, produced in 1968, had fallen into public domain. Director Jeff Broadstreet refers to his version as a “retelling” versus a “remake.” This distinction being the updating and changes in story details. But there’s no question that it is generally faithful to the original, even featuring clips from the original film within the story. “It should be considered an homage,” says Broadstreet. At first, Andy Parke was focused on shooting HD with Sony F-900’s. The DIMENSION 3 MKIII base unit was perfect for such a configuration, being the smallest, lightest, professional base of its kind at the time (not to mention affordable). Shortly thereafter, Parke brought director Broadstreet and screenwriter Robert Valding to see a demonstration of our Natural Vision® anaglyph system as well as the MKIII. The anaglyph Natural Vision process was chosen from the start as being the only viable 3D method for mass DVD distribution as well as theatrical. True enough, I prefer polarized projection over anaglyph. But the reality is there are few silver screens in theaters, leaving anaglyph as the only practical way to get real 3D in a theater near you. What attracted my attention was that it had been decided to distribute theatrically, even in light of other contemporary "anaglyph" attempts that have been less-than-stellar. Based on D3’s experience, we felt we could do better than the big boys with the deep pockets, so the challenge was on. Other HD cameras were considered, and I mentioned to Parke that I had designed a new rig based on the about-to-be-released Sony HVR-Z1. Parke was immediately interested. He also held out hope for a hand held system. The one aspect that really wagged the dog was that the budget for the film was not only less than a million dollars, but WAY less. Ambition was the mantra. While at NAB, Parke did the rounds and the more he looked, the more interesting the Z1 appeared. Other systems were much bulkier, heavier, difficult to use, and/or too costly. My interests in the Z1 date back to the summer of ’04 with the announcements of the upcoming FX, the less-featured version of the Z1. I felt it was a good choice for a modest rig size/weight while allowing HD for video production. At that time, I didn’t foresee feature production with such a system. One point of considerable discussion was this camera’s HDV format. True HD has an image that is 1920x1080 pixels. And it is generally preferred to be 24 frame progressive (24p). The HDV format Sony chose is a virtual 1440x1080 (1.33 horizontal squeeze, same as the Sony HDCAM format) interlaced, at either 25 fps (PAL) or 29.97 (NTSC) (50i, 60i respectively). During post, the footage is eventually transcoded to another format, namely unsqueezed, uncompressed 1920 HD. The issue is: interlaced versus progressive. 1080i has more vertical lines and horizontal lines (versus 720p) and therefore more overall detail (resolution), which is good for 3D. But progressive is better for subject motion, albeit with less overall resolution. Also, if film is the goal, all formats must eventually become 24P. Thus 1080i was a concern. More on this later. My partner on this project (as on many others) was Steadicam great, Jerry Hill. We had both been looking into a PRACTICAL Steadicam system for years. This appeared to be it. Hill and I have worked together since 1995 on many 3D projects, and on this one he was the 3D Technician. His duties were to set up the 3D cameras and maintain the 3D aspects and handle the 3D settings in my absence or for the 2nd unit. 3D is a difficult subject (apparently), but Hill has become very skilled and an important part of my business. One Steadicam approach, using modified F-900’s with the removable prism blocks, was tethered to equipment and lacked interaxial adjustment (distance between the two lenses – which is required), had too large of a minimum interaxial (professional production requires interaxials sometimes as small as ½” or less, to avoid eyestrain), and lacked the precise camera optical alignment required for professional results. Yet another Steadicam approach was a rig that resembled a Volkswagen in size that would surely put the operator in traction, and was also tethered. As a DP myself (Local 600 retired), my goal was a system that was PEOPLE friendly, easy to learn and use, lighter and smaller, allowing for rapid production with small crews, etc. As soon as the Z1’s were available to us I completed the overall design of the rig. In mid-March, Parke shot a test with an F-900 and a Z1 side-by-side for comparison. The resulting tapes were handed to CFI/Technicolor for output to film. The two versions were alternated and split-screened. Scenes were shot exterior night and low-key interior (that being the dominant setting of the film); challenging conditions for video. When the film was viewed over and over, all concerned were amazed. While the F-900 is a superior camera, the differences compared to the Z1 were such that non-technical observers simply wouldn’t know the difference. The decision was finalized and Midnight Movies Entertainment contracted DIMENSION 3 to provide a Z1 3D system. The original start date was early May. Being early April, I went into a crash development to solve some peculiarities of the Z1 camera. First and foremost, 3D requires two synchronized cameras. That specifically means they need to be genlocked, so the “shutters” open and close at the same time. Like all “prosumer” cameras, the Z1’s lack genlock. Amateur hobbyists often lash two DV camcorders side-by-side to produce 3D that, well, works well enough for home movies. But for professional results, there cannot be ANY visible time difference between the left and right views. Second, professional filming requires follow focus. Early articles on the FX/Z1 stated the focus scheme was NOT perpetual (i.e. having stops), as is the rule with amateur cameras. We were therefore led to believe this wouldn’t be a problem. When we finally got cameras in hand, we found the focus was indeed perpetual which ultimately presented the biggest speed bump. Development on the synchronization led to a “black box” that could look at the video coming out of the two cameras, compare them and tell you if they were close enough in sync for acceptable 3D use. Close enough was defined as ¼ of a field or less difference between the cameras. This requirement was easily met. I conceived the concept parameters and our electronics genius John Long designed and built it. But then I discovered an existing unit intended for another use that, with slight modifications, provided even better precision, typically to less than a millisecond sync difference. The follow focus was still the biggest issue. Gears were already on the market, as were follow focus attachments, but these wouldn’t work for two cameras that also needed to move in relation to one another. Issues about weight precluded the use of conventional focus motors and the attendant electronics (along with lack of time). We also found that the focus was not reliable, with regard to the physical rotation of the lens barrel and the distance readout. This is because of the servo design Sony uses. Another issue is that the focus distance is only indicated on the camera’s viewfinder (no lens markings). And that distance reading is strictly in meters for some reason (rough on U.S. assistant cameramen) – and was itself another problem since that reading disappears from the viewfinder after a few seconds of the last focus change! Sony really fell down here. They should have real focus with stops and marks. We continued exploring and finally decided to attempt using the LANC port on the camera to adjust focus. But this was fraught with problems. Yes, at times both cameras could be focused the same. But often it would easily get out of sync. D-Day approached rapidly. A critical component of the system is the beamsplitter (half mirror). Over the years I’ve had many mirrors made by various firms. All had issues which I learned to work around. But this time, I found a vendor that went the extra mile and produced mirrors I can only say are apparently perfect for the system. They are very well matched for exposure (density, transmission, reflection), color balance, anti-reflection, and flatness. The latter is important as Parke likes to use long focal lengths, and most beamsplitters I’ve seen don’t permit very long focal lengths. This encouraged my thoughts of long focal length shots, absent from most 3D efforts. The rig was completed for the most part about a week before shooting and a quick test was shot, encoded in Natural Vision, and output to film. In spite of some errors from rushing things, and the film print being timed too dark, the overall consensus was we were not only in the ball park, we were rounding third base. The system was christened the HD3Cam™, based on our previous standard definition camera, the D3Cam™. 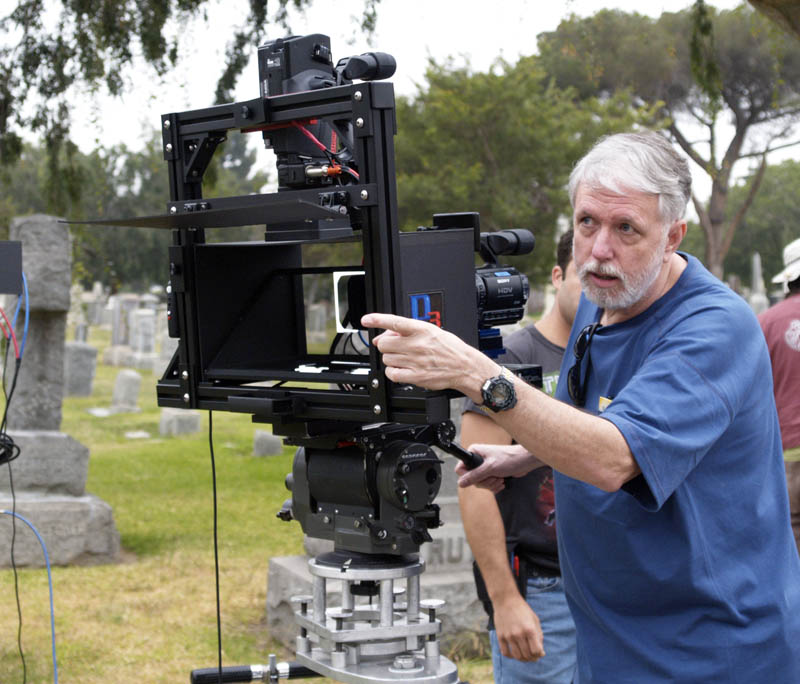
Dan Symmes with the HD3Cam on location.
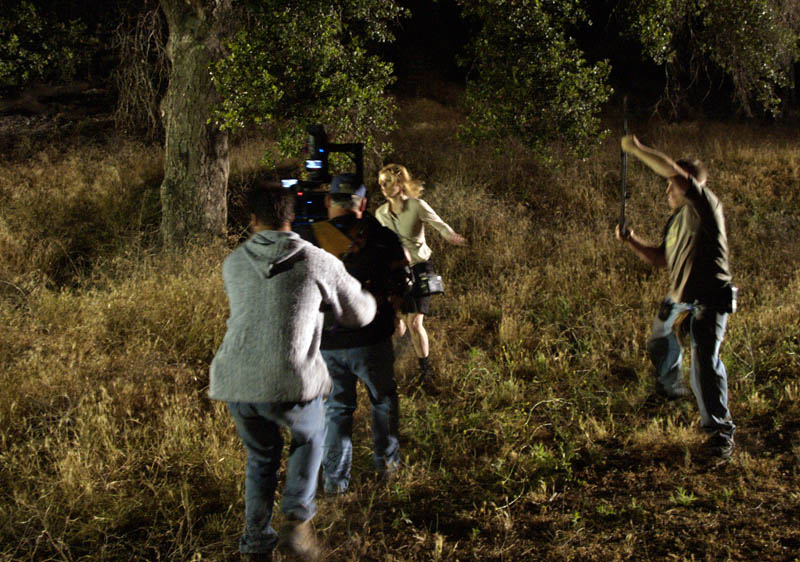
As the days passed, the director became concerned by the schedule shrinking by 6 days, and asked if there was a way to set up a “B” camera. At first I felt I could retrofit the MKIII to accept rented Z1’s, but this wasn’t practical. So I decided to not only make a 2nd HD3Cam, but to help in the weight department (for Hill’s Steadicam), I modified the original design, shedding about 6 lbs, which made a considerable difference in balance. The shedding of weight meant some loss of rig rigidity, but from my 30+ years of experience, it was within limits. Steadicam work rarely puts much G force on cameras. Thus were born the “studio” and “Steadicam” versions. Final electronic work and cosmetics were completed the day before shooting, and I held my breath. On 16 June production commenced at the Rosedale Cemetery in Los Angeles. The entire day was exterior, at one location, and things went very well. 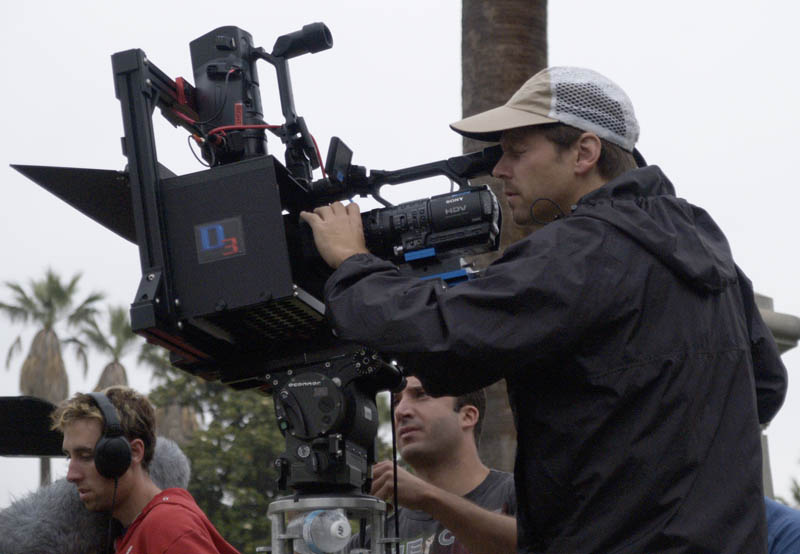 DP Andrew Parke lining up the HD3Cam on the first shot of the first day.
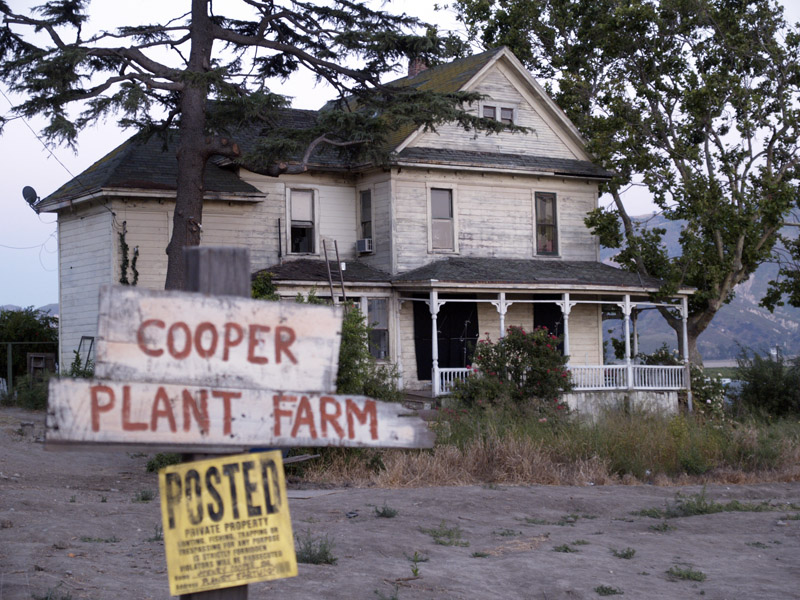
We then were moved to a farm house in Fillmore, about 43 miles northwest of Hollywood.
The house was reputed to have been built in 1897, and “they” say a woman committed suicide by jumping from the upper floor. It was a pretty spooky place, appropriate for the genre of the film. It had numerous rooms, and all were quite small. Nonetheless the HD3Cam was able to shoot anywhere the director wished. 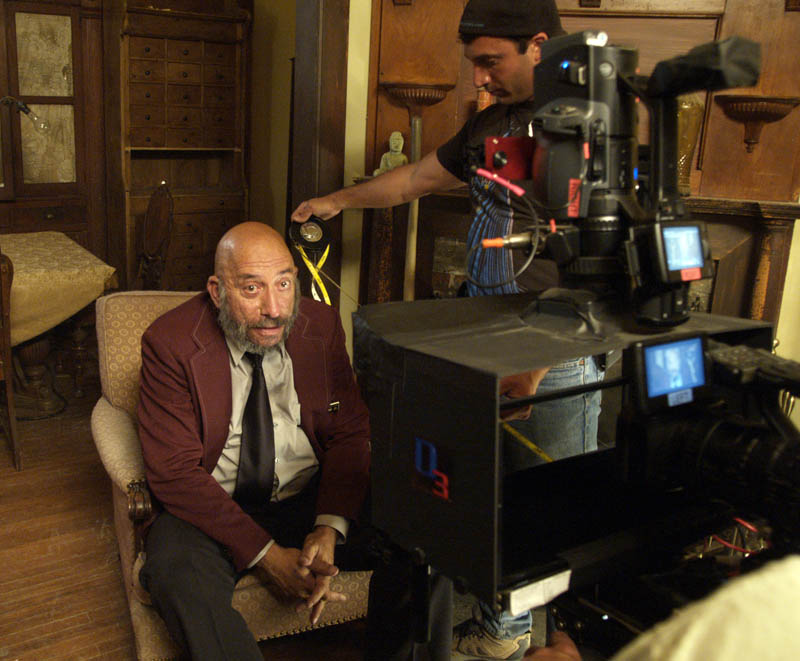 Actor Sid Haig is measured by AC Jim Firios.
True stereo (“three dimension”) requires photography from a minimum of two, horizontally separated viewpoints. The camera must imitate that our eyes are horizontally displaced. From the earliest days of stereo photography to this day, it is a common misconception that the camera lenses should be separated a distance (interaxial) similar to our eyes (interocular). This is a leading cause of eyestrain in 3D films made since the 1960’s. The HD3Cam has a continuously-variable interaxial range from 0” (no 3D at all) to nearly 6”, depending on focal length. Convergence is also required for professional 3D. Schemes of no convergence (IMAX), convergence tied to the focus, or “converging in post” don’t work, as continues to be demonstrated. The HD3Cam has a precision convergence system, going from infinity to inches from the front of the rig. The anaglyph principle has been understood since about 1858 and is not complex, though it is rather exacting. Stereo pairs (the left and right eye views) always need to be “encoded” for print as, for example, left image printed with cyan ink, and the right image red ink. When viewed through glasses having a blue lens over the left eye and red over the right, the blue will only see the red ink – the right eye through the red lens, only blue ink. Thus the two views are “channeled” exclusively to your eyes, and the brain sees 3D. The simplest examples of anaglyph are 3D comic books from 1953/54 and the 1980’s. The primary drawback to anaglyph is the colored glasses. Because of the colored lenses, the colors of the scene are distorted. The brain however is remarkable at adapting, and in a few minutes, one can discern colors in the film, though still far from perfect. For this reason, certain colors are to be avoided, and the general color palette should be one of earth tones and pastels. Contrary to other anaglyph systems, with the D3 Natural Vision process, when viewed without 3D glasses, the picture is viewable. It looks different, but one can enjoy the film. And the scene colors are normal.  Example of Natural Vision (actual frame). View with 3D glasses with the RED lens over your RIGHT eye.
D3 (as 3D Video Corp.) invented color anaglyph video for television broadcast in 1980 (patents granted in 1986-7) and produced the world’s first color anaglyph poster for 1983’s JAWS 3-D for Hallmark. The primary advantage of the anaglyph process is that it can be exhibited in any theater (no special screen or projection devices) and can be distributed on DVD. The analogy is that 70mm film is strictly for theaters, so VHS and DVD are for mass distribution. VHS/DVD aren’t nearly as good as polarized projection, but the public is willing to accept compromise, as long as the film is worth watching. And while public opinion of the recent anaglyph films has been generally negative, in tests, we have found much more positive, encouraging reactions to Natural Vision. The differences are camera alignment, proper application of interaxial and convergence settings, color design, scene staging, and working closely with the lab. It doesn’t hurt to also have over 30 years of 3D film and video experience on call. Early on, Parke set up a very difficult shot for 3D, with a major object about 2’ from the camera, and a background down a hall nearly 30’ away with strong backlight in the room at the end of the hall. My job is not to direct the picture. But if they insisted on keeping the shot with difficult staging, I would have to reduce the interaxial considerably to flatten the scene out. Not totally flat, but enough to keep the parallax (depth information) within limits. Parallax limits are not standardized by any means. But Hollywood did very well for most of the films of the 1953-54 “golden era” during which over 50 English language 3D films (including shorts and cartoons) were made. Sane practices brought HOUSE OF WAX, KISS ME KATE, CREATURE FROM THE BLACK LAGOON, IT CAME FROM OUTER SPACE, HONDO, DIAL ‘M’ FOR MURDER (and MANY others) with excellent 3D qualities with which most films made since can’t even compete. By sane, I mean that the cameramen and stereographers of that era shared information – networked – producing 3D that was generally very good, but easily working within the studio system. Most 3D films made since about 1966 have exhibited often severe parallax problems. A current big screen 3D system is one of the worst offenders of parallax. 100% unnecessary eyestrain. Excess parallax literally exercises the eyes, so one needs to know how much exercise is tolerable while watching a two hour movie. While this has been covered in technical writings, I shot extensive film tests back in the 1970’s and 1980’s using math constructs as the starting point, and empirical results to define real world parallax limits. This lead to various computer programs, ultimately becoming SPATIAL Efx™, a computer program in a hand held computer, which made complex 3D situations easy. Yet, for the past 10 years, I’ve been using a monitoring system that I developed that allows me to see the parallax (more on this later). That, along with my experience, yields almost immediate interaxial and convergence adjustments (typically taking a few seconds). Production isn’t waiting for 3D. So, when a scene is staged, and cannot be changed, I then have to adapt the 3D settings to the scene, and make sure the parallax remains within limits. As this film is to be exhibited in anaglyph (versus polarized) projection, I had further restraints, since anaglyph is a less-perfect technique that itself has issues with excessive parallax. Once I explained this to director Broadstreet and DP Parke, we were off and running. 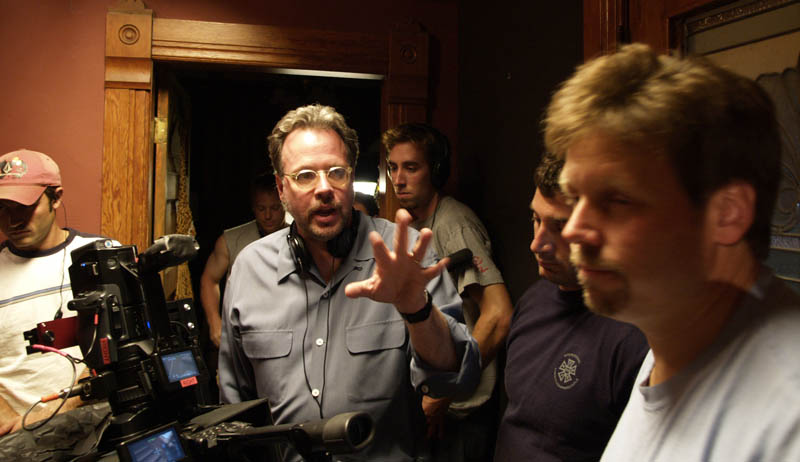 Director Jeff Broadstreet (center) describing his shot with DP Andrew Parke (right).
A short shooting schedule isn’t news, but that didn’t make it easy, especially with a night schedule for the most part. Even as I write this, I am recovering an intense "few and long days" schedule. We had to move fast, and the HD3Cam never held up production. This is not to say we didn’t have issues with the Z1’s. Focus became the big issue for assistant cameraman Jim Firios. He was very frustrated by the hit-and-miss way the cameras wouldn’t sync, focus-wise. Yet, to his credit, he managed to work with it and we got our shots. The Z1 is not a professional camera in the usual sense yet it got us through a challenging shoot. It is in fact a remarkable camera for the price. Parke worked in advance of production to create a long check list of the Z1 settings and configuration. The programmable (“user”) buttons on the camera were VERY handy putting menu features just a button push away. From day one, it was Broadstreet and Parke’s focus to achieve a “film look.” To help this, Parke decided to shoot 50i, which allows a film-like shutter speed of a 50th of a second. This is also PAL, and in post production, eventually proved to be a significant issue. As it turned out, he didn’t need to shoot PAL. When the interlaced images are deinterlaced, flat frames then have the blur of the two successive fields. Therefore, the presentation has more apparent motion blur. So while the motion blur of 50i resembled “film,” deinterlacing made it look like it was a slower shutter speed. Had the film been shot at 60i, when deinterlaced, it would look more like “film,” blur-wise. Lastly, by shooting at 50i, deinterlaced becomes 25 fps (PAL). This makes for significant problems for post production. 60i deinterlaces to 23.976 (24P). But, one has to remember that at this time, HDV was bleeding edge, and had no history. We were pioneers bleeding the best we could. The challenges for 3D were the same as for any production: make it look good. But having been at this for enough years, I decided to take a different tact. As the film has quiet, non-action sequences building to heavy action and violence, I felt the 3D should change with the emotional tone of the story. 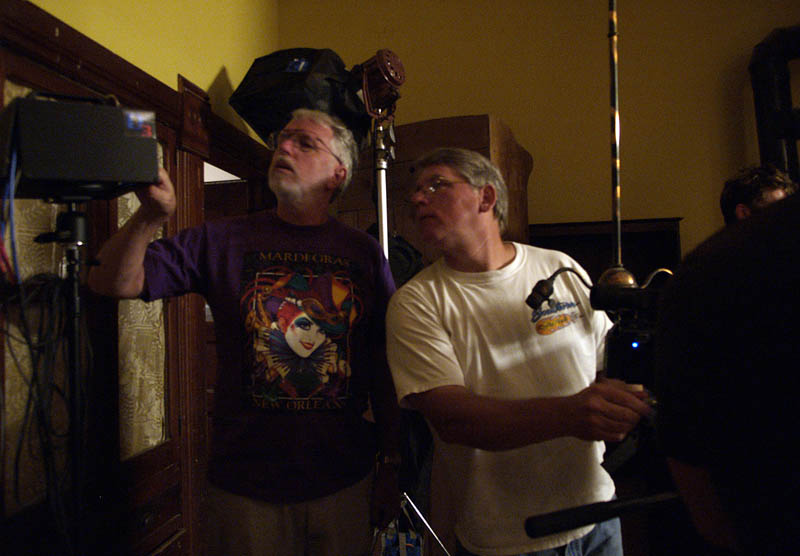 Dan Symmes and Jerry Hill adjusting a shot with the D3 3D monitor, allowing us to see the shot in 3D.
So for the first time I am aware of, the 3D was manipulated in response to the story. For the most part, I used a conservative approach for quite scenes. The 3D is there, but not “knock your socks off.” Some shots were hyperstereoscopic (wider than normal interaxial) that makes the subject “deeper,” but also seeming smaller. As the action ramps up, so does the 3D. Are there 3D gimmick shots? Sure. But Broadstreet didn’t want gags to distract much from the story. In many 3D films, the gags stop the show. Broadstreet showed remarkable restraint which I fully agreed with. Another tool I brought to the game was a 3D monitoring system. Originally developed in 1980 (at 3D VIDEO CORP.), I abandoned the concept years ago as it was a distraction; everybody wants to see the 3D in a box. I personally don’t need to view shots in 3D. My alignment work can easily be 2-D, and is actually better that way. 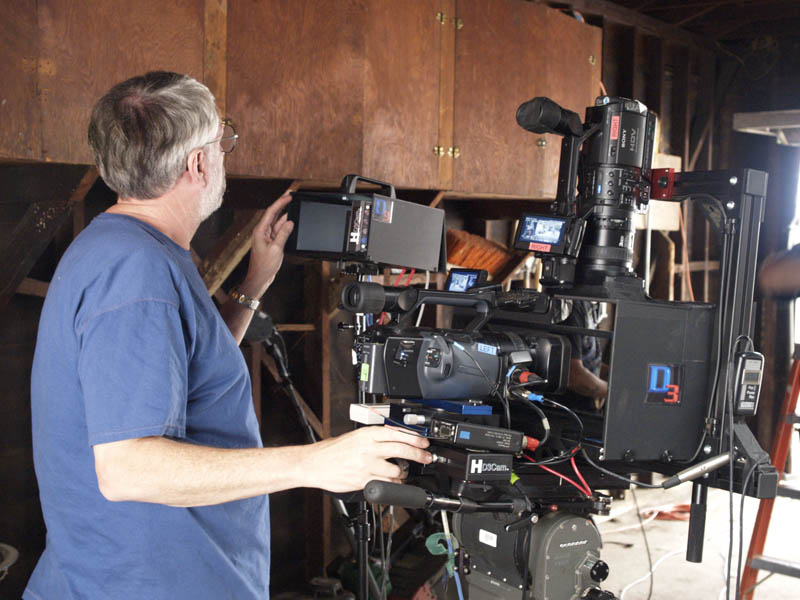 Dan Symmes adjusting the HD3Cam with the 3D monitor.
But as this production loomed, and with some nervous people around me, I felt it best to be able to show them SOMETHING. The Camera Alignment Unit (CAU) is smaller than a lunchbox, and mounts on a small stand, allowing it to be “in my face” while lining up the cameras. The biggest issue is that NO small stereoscopic display will give a true impression of what the shot will look like in a theater with 300 times magnification. It gives a false impression which I have to always warn about. Nevertheless, Broadstreet and Parke relaxed and concentrated on the picture once they actually saw 3D. 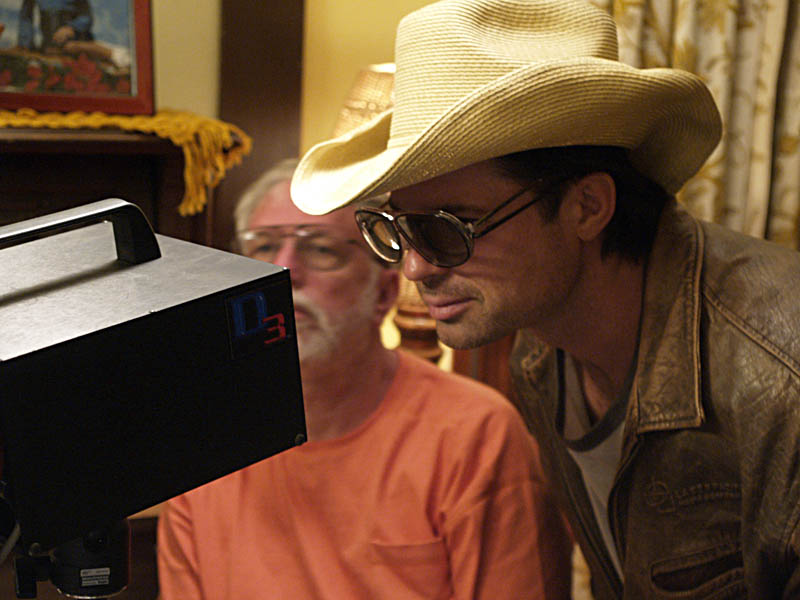 Line producer Lazo Bene watches the scene in 3D.
From the beginning Broadstreet imagined the use of Steadicam. So having my partner Jerry Hill on board was a perfect match, as I can’t imagine a better-qualified Steadicam operator. The HD3Cam was designed to be as compact and light as possible, but it still weighs over 30 lbs. Most significantly, because of its design, it’s very top heavy. Using Jerry’s own sled design (the Jerry Rig) was crucial in making all this possible. Other models of Steadicam (or other such systems) likely wouldn’t work. Prior to production, we mounted the HD3Cam on his rig and he determined he indeed could fly it. 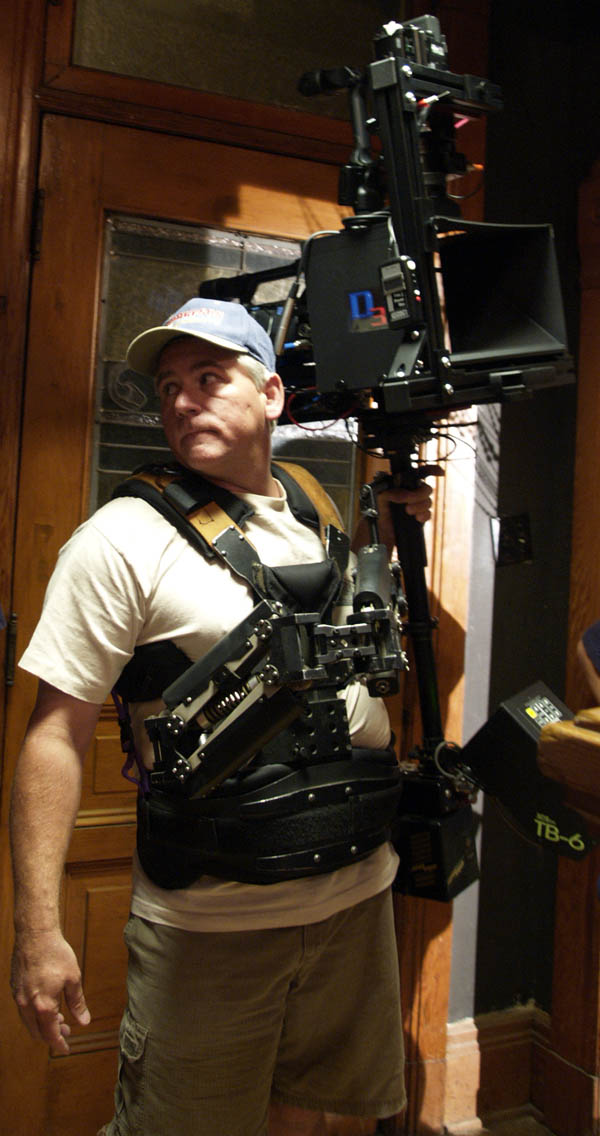
 Jerry Hill doing the spectacular in shooting the first professional Steadicam shots on HD.
But on production, at first the rig didn’t balance. There were some tense moments, but we finally found it was the camera batteries. The test was done with the smaller batteries that come with the cameras. But for production, we were using the larger (heavier) 970 batteries. That pushed the system just over the limit! With the right batteries, Hill suited up and flew 3D like it’s never been seen.  Jerry Hill running backwards on rough terrain - for amazing 3D.
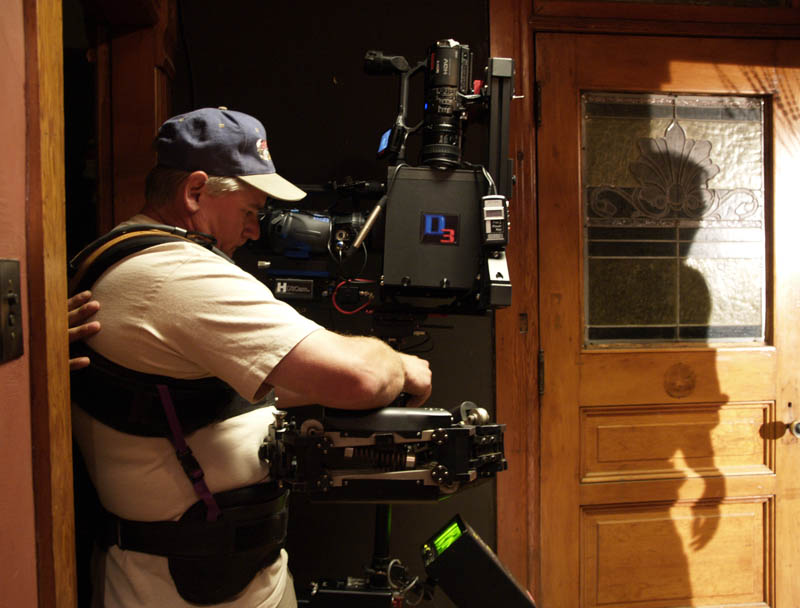
“I was responsible for the Steadicam operation and setup,” says Hill. “This had unique obstacles to overcome. “The dual camera 3D rig was just shy of the weight limit of the Steadicam arm. Yes, heavy! It was not only the weight but the size of the rig. The 3D chassis was big and cumbersome, but small considering the previous models throughout history. Unlike my normal operating, where I have a Zen or feeling of the size of the camera body and can position myself and it through space, the 3D chassis was wide so I had to allow for extra space and watch for camera shadows. I had to pay attention to the width and the height of the rig. The balance of the rig was particular as well. “I worked close with Dan and Andy to try and walk through the shot first. Dan got an idea of the convergence and I could check for bogies and the blocking. After I mounted up the Steadicam I made final balancing adjustments. The interaxial and convergence were set before I walked onto the set. “Another concern was getting a kicker off the beamsplitter in the shot or in the talent’s face.” 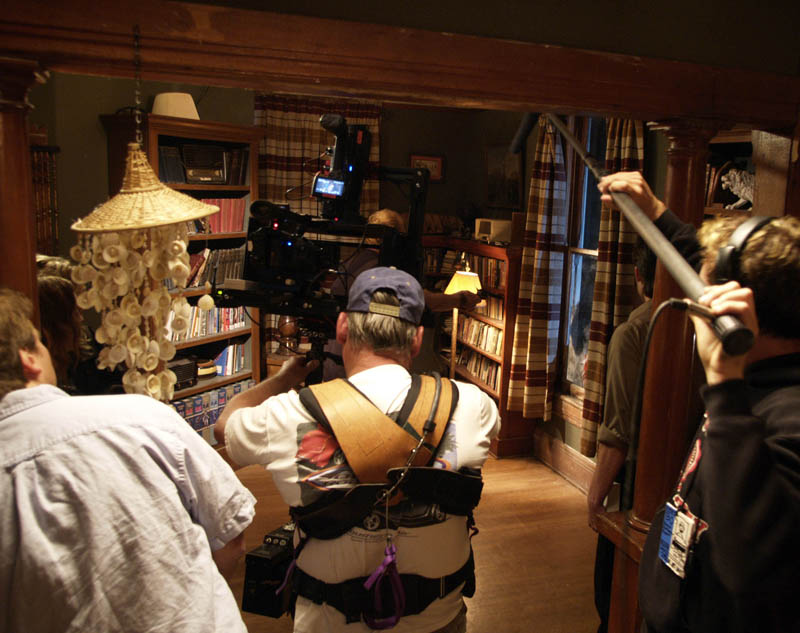 Jerry Hill moves in on an action scene. Note the clearance of obstructions on the set.
Another matter decided by Parke prior to production was his determination to shoot hand held. I was highly skeptical all along, even after completing the rig. Yet, I added hand grips and a shoulder pad to the Steadicam unit to help. In spite of my reservations, Parke did hand held often and, while I don’t recommend it, I have to say he got some really great shots that make us feel we are in the action. 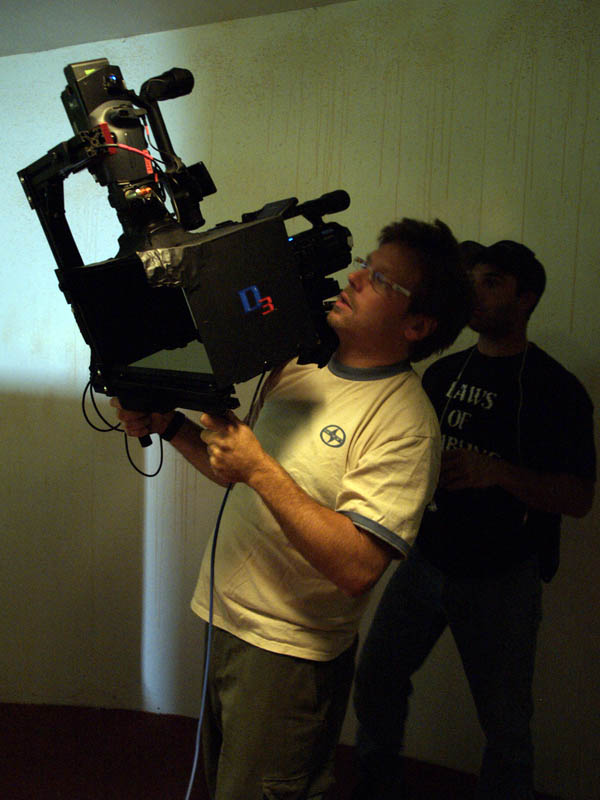 DP Andrew Parke doing hand held shooting. NOT recommended.
Another issue with the Z1’s is time code. While they have internal SMPTE time code, there is no known way to have them frame-accurate between the two cameras, needed for editing. So I decided to feed TC into one of the XLR audio channels of each camera. Sadly, we found the signal bled through to the other channel, so we could only use that channel for a “guide” track. This is truly a double system scheme. The soundman has the “master” time code, and records the track on DAT or HD. The HD3Cam has a small TC generator that is jammed at the start of the day to the master source, which also feeds the slate. Thus, the identical TC was recorded on both cameras as an audio track and was seen on the slate. We also clapped ALL scenes in case something happened to the TC (I’ve seen it happen over the years), so the editor still had SOME sync reference. One issue I was concerned with was the inability to view “dailies.” Mainly because of budget constraints, we saw NO footage. Broadstreet and Parke were strict not to review the tapes in any way (fearing the small tape format would possibly be damaged - dropouts, etc.), and as the editor had yet to be hired, no capturing was done except for one tape early on to make sure we had images! To aid Broadstreet, I had a video feed from the HD3Cam available for his “video village” which was often in another room. We also had a waveform monitor so Parke could better evaluate his lighting. When using the Steadicam, we used Hill's wireless video system for director monitoring. In the second week, Broadstreet had the Steadicam HD3Cam join the shoot as a full time B camera to shoot 2nd unit, manned by DP Joe Setele and assistant Dante Mazzola. We often brought the B camera in for two camera setups which gave Broadstreet even better coverage. This was interesting to me, as one camera was wide while the other was tight. This difference in focal lengths is normally ignored by others in 3D productions. But to intercut to my standards, I had to carefully determine interaxials and convergences – otherwise cutting could be jarring to the eyes. 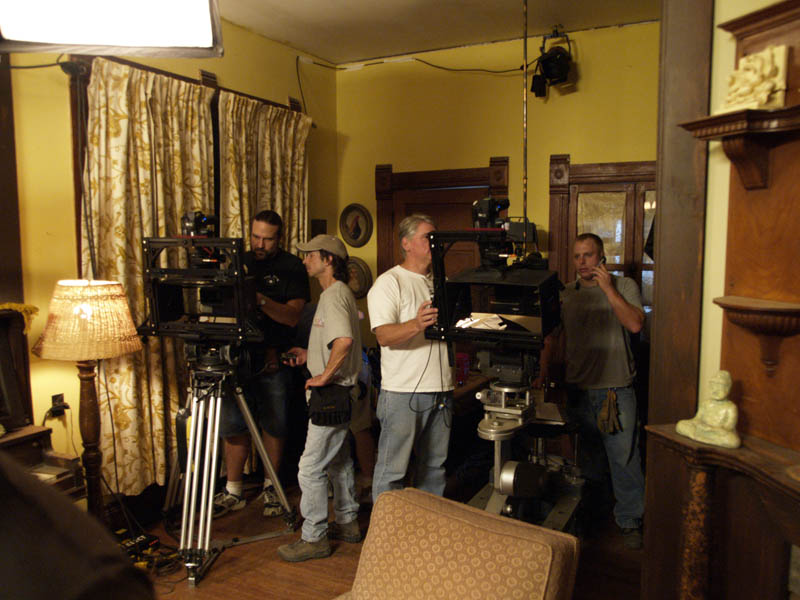 Two camera coverage, even in tight quarters.
This goes back to 1997 when we had for the first time three cameras covering scenes for the 3D episode of the DREW CAREY SHOW. The time came when driving shots were called for. As the budget didn’t allow for a Shotmaker, the next best thing was to mount the HD3Cam on the car. Gaffer J. J. Rogers rigged his “hostess tray” (car mount) which worked well, allowing the camera to be mounted on either door. It was quite a sight to see the rig riding down the street mounted on the diminutive Mini Cooper. Honestly, it looked like the tiny car would tip over. The results with the rigging were mixed, as we later found—too much vibration as the car's door was too flexible. 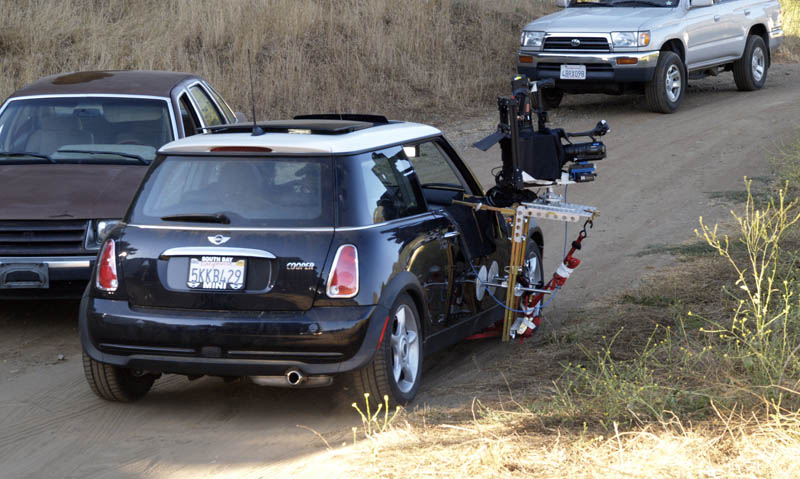 HD3Cam mounted on a tiny car. Will it tip over?
Broadstreet or Parke would squeeze into the back seat along with a monitor to direct while driving along. We also rigged the camera on sticks through the sun roof for POV driving shots. 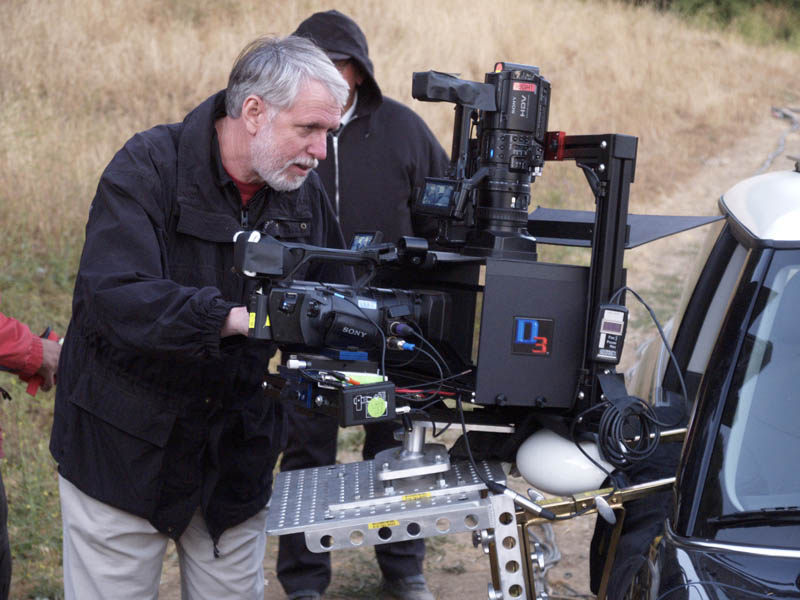 Dan Symmes lining up the HD3Cam. This film allowed Dan to shoot like no other professional 3D system can, giving the director virtually any shot he can imagine.
In another scene, we mounted the HD3Cam inside a car which allowed incredible “you are there” shots. Gag shots involving blood shooting toward the camera required protection of the beamsplitter. Normally a large sheet of Plexiglas is held with C-stands in front of a 3D camera. This has MANY problems, as you can’t move/pan the camera, and reflections are a huge problem. So for the HD3Cam, I designed an integral Plexiglas holder so small panels could be instantly mounted ON the rig. This was an ideal addition, even for Steadicam shots. 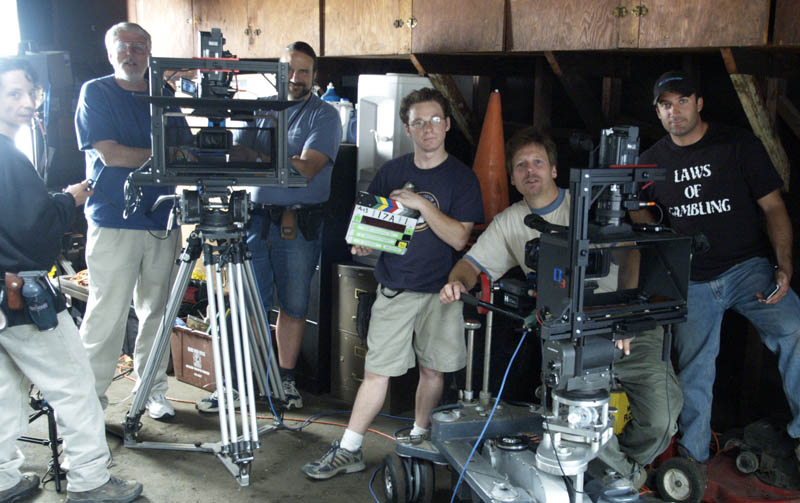 The crew (Jerry Hill taking the picture) L to R: 2nd unit AC Dante Mazzola, 3D Dude Dan Symmes, 2nd unit DP Joe Setele, 2nd AC Scott Resnick, DP Andrew Parke, and 1st AC Jim Firios.
Post production was a difficult process as, like I said, we were on the bleeding edge. And not helping was that some aspects were handled on MAC, others on PC. Yet in spite of all this, we managed a result that still surprises me. The key point I keep recognizing is that we shot an entire feature, in 3D, in HDV, with prosumer cameras and when shot out to film, and seen on the big theater screen—I can hardly believe it. Though the film is intended for anaglyph distribution, it was seen once to the max. At midnight, 8 September 2006, opening night of WORLD 3-D FILM EXPO II at the famous Grauman's Egyptian Theatre in Hollywood, NIGHT OF THE LIVING DEAD 3D was seen in dual projector, polarized 3D. All humbleness aside, it looked fabulous. Overall I am very pleased to see my “baby” perform as well as it did. My goals were met in having 3D interface with production with the least impact on the crew and production schedule. And more importantly, we achieved natural 3D with no eyestrain—something seemingly impossible for the big budget films. Film director James Cameron leads a choir chanting "down with anaglyph." This is very easy to say from his position. But the economic realities of the entertainment business are such that anaglyph is a necessity to get some GOOD 3D entertainment to all of the world—not just a select few theaters. Should Mr. Cameron ever want to produce 3D right (my chant is "no more eyestrain"), we would be happy to help. Noted 3D film historian Ray "3-D" Zone, after seeing the anaglyph version of NOTLD said: "The whole pic had great 3D with a tasteful use of the stereo window. Anaglyph also worked very well." He should know. According to Jerry Hill “This project was especially ambitious because of the budget and the 3D process. Time was not on our side. In most cases we where very limited to the number of takes we could do and the amount of time we could spend on a setup. Everyone one had to be on their toes to make this project work. I believe this is a major first on this scale and budget. The G&E crew worked their rears off to keep it going. We all banded together to achieve a labor of love and pride in what we do.” I cannot say enough about Andy Parke’s dedication to high standards which lead to something now greater than the sum of its parts. On the last day, Jeff Broadstreet came up to me and said “…and we never waited for 3D.” That was the finest thing he could say.
3D GALLERY Here are some scenes from the film (actual frames except for the last shot). View with the RED lens over your RIGHT eye. 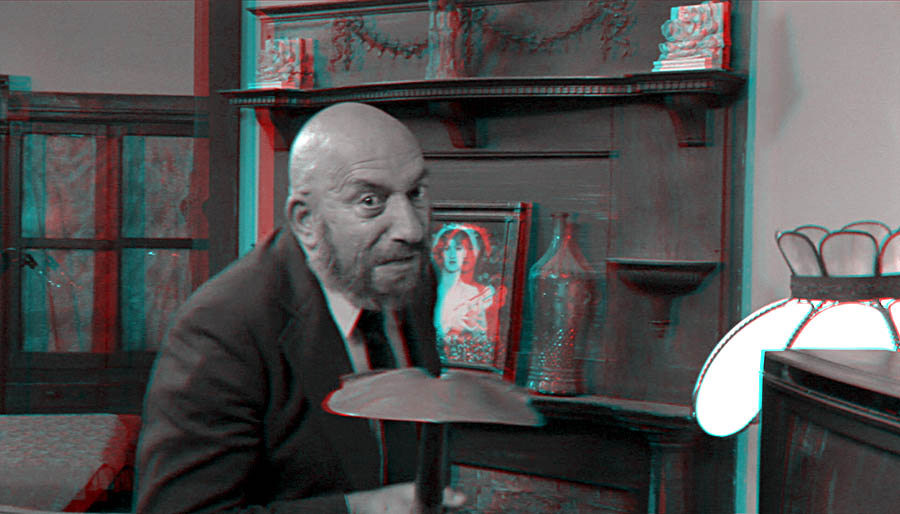 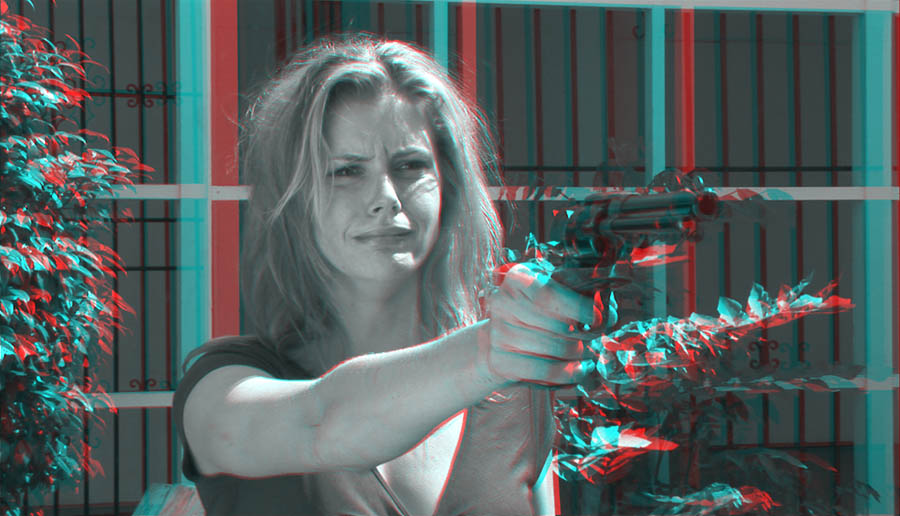 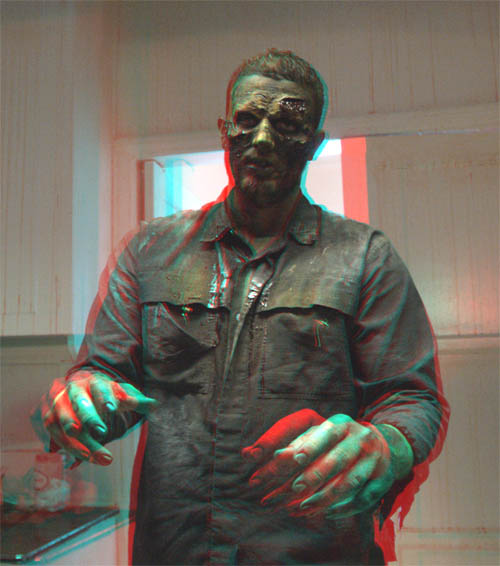
|
All content, unless otherwise indicated, is
© 2007,
Daniel L. Symmes
All rights reserved.